
Web Portal
https://phone.rit.edu/ – Information and Web Based Phone App
https://phonesettings.rit.edu/ – Manage your account and make changes
Intro Videos from RIT
We strongly recommend you watch these videos first. The provide a lot of useful information tailed to RIT.
- Getting started with Avaya Cloud Office
- Using Avaya Cloud Office
- Customizing Your Avaya Cloud Office
Avaya Cloud App
Installing
Computer
For Saunders computers, the Avaya Cloud Office app should already be installed. If you need to install it for whatever reason, please use Portal Manager.
For personal computers, go to https://phone.rit.edu/ and sign in. Once signed in, click on your profile picture and then Download desktop app

Android & iOS
Android: https://play.google.com/store/apps/details?id=com.avaya.cloudoffice&hl=en_US&gl=US&pli=1
iOS: https://apps.apple.com/us/app/avaya-cloud-office/id1495845694
Signing in
To sign into the Avaya Cloud Office app or websites, be sure to click on the Single Sign-on Button
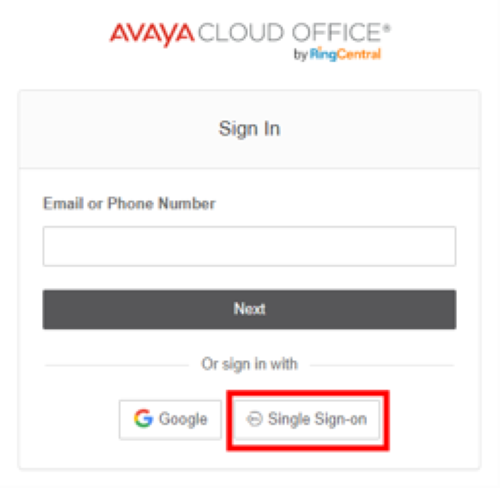
Enter your RIT username followed by @rit.edu. Example: abcbbu@rit.edu
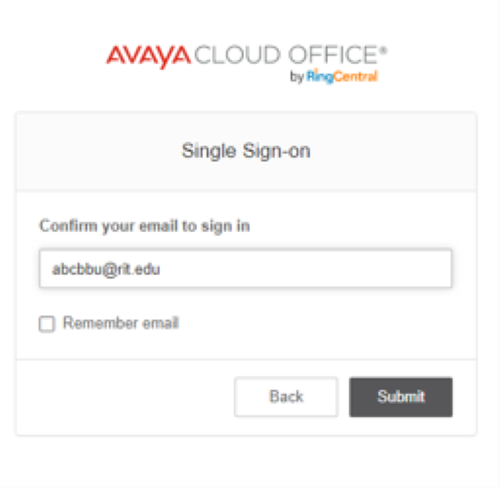
Once you click Submit, you’ll be redirected to an RIT login page.
Documentation
RIT Knowledge Base Articles
See https://help.rit.edu/sp?id=kb_category&kb_id=ab081d001bfdc0507cc34377cc4bcbf3&kb_category=8982835287ad2510cd6c20e9cebb350c for all of the various articles in RSC about Avaya Cloud Office.
SmartPhone App
By using the SmartPhone App, you do not need to enter your personal phone number into the Avaya Office Cloud system, keeping it confidential.
Android: https://play.google.com/store/apps/details?id=com.avaya.cloudoffice
iOS: https://apps.apple.com/us/app/avaya-cloud-office/id1495845694
Change smartphone ringtone
By default, the Avaya Cloud Office app will use the same ringtone you have for your smartphone. To help differentiate which number is being called, you may want to select a different ringtone for the Avaya Cloud Office app.
Open the app and tap on the icon in the upper left.
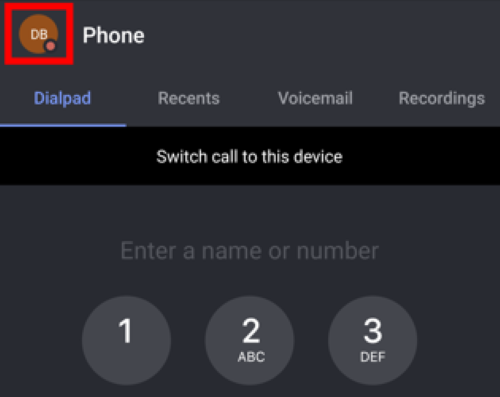
Tap on Phone
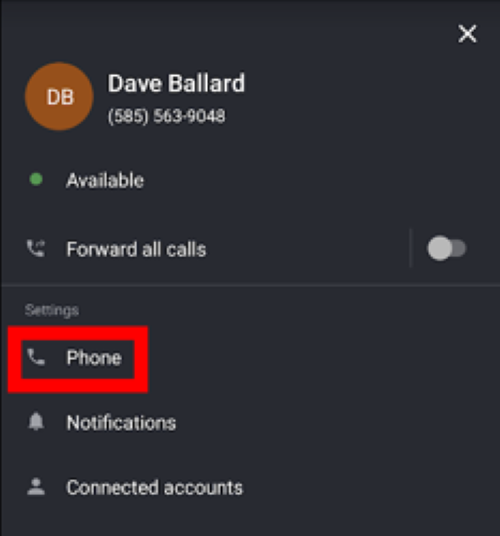
Tap on Ringtone
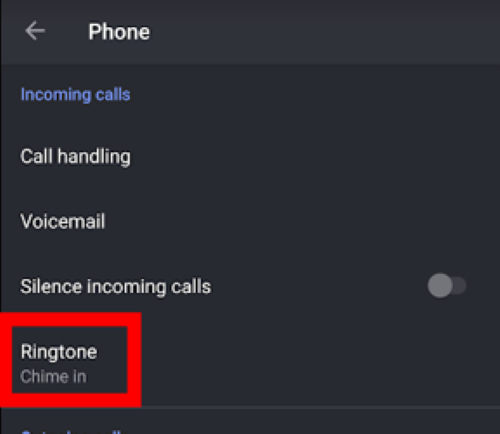
Select the desired ringtone.
Switching between devices
The Avaya Cloud Office app on your smartphone can be used to make and take calls without configure your personal cell phone number in the Avaya portal. It is also possible to move a call from your computer to your smartphone’s app and back. Here’s how.
Transfer call from computer to smartphone
If you are on a call on your computer, open the Avaya Cloud Office app on your phone. Along the top, you will see Switch call to this device. Tap on that.
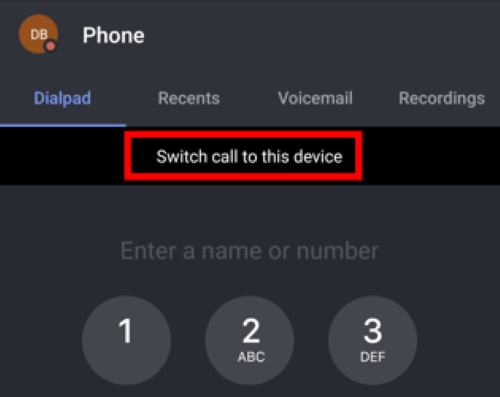
This will automatically switch from your current device to your Avaya Cloud Office app on your smartphone.
Transfer call from smartphone to computer
If you are on a call on your smartphone, open the Avaya Cloud Office app on your computer. Along the top, you will see Switch call to this device. Click on that.

This will automatically switch from your current device to your Avaya Cloud Office app on your computer.
Who can see my presences?
By default, someone will be able to see if you are or are not on a call, but not who you are on a call with. You can modify this to grant someone access to answer your phone as well as see who you are on a call with.
See https://help.rit.edu/sp?id=kb_article&sysparm_article=KB0042769 for details.
Known Issues
Cannot play a department voicemail
When you are added to a department line to monitor voicemail, you will not be able to play any messages that were received prior to you being added to the account. Unfortunately, you’ll get an error that says you have insufficient network bandwidth to play the message. The real problem is you don’t have access to the voicemail. ITS is working with Avaya to see if they can correct this misleading error message.
Any voicemails received to the department line after you have been granted access should play correctly.
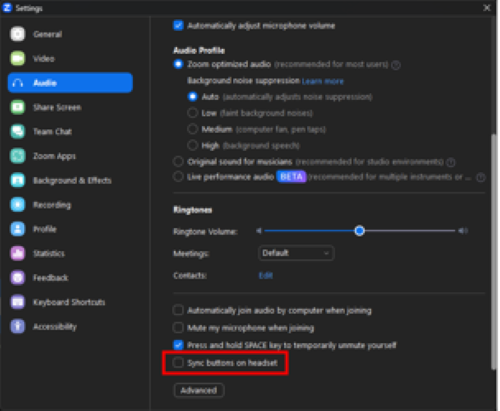
Zoom Conflict
When on a Zoom call and you receive an Avaya call, Zoom may cause the speaker volume to go down and not come back up. To fix this, you have to leave the Zoom meeting and come back in.
To prevent this from happening, in your Zoom settings on your computer, make sure you uncheck Sync buttons on headset under the Audio settings.
Headsets
App Headset Settings
It is possible to configure which speaker/mic the Avaya app is to use. Here’s how.
Open the Avaya app on your computer.
Click the Settings icon in the lower left corner of the window.
Click on Notifications and audio along the left-hand side.
Under Audio input, select your Microphone source
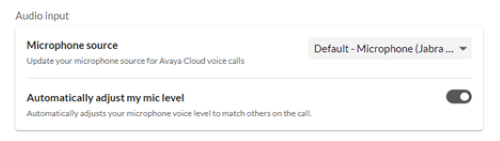
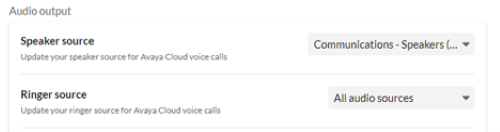
Under Audio output, select your Speaker source.
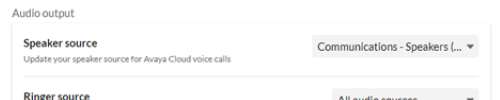
For the Ringer source, we recommend All audio sources so all of your speakers ring for an incoming call.
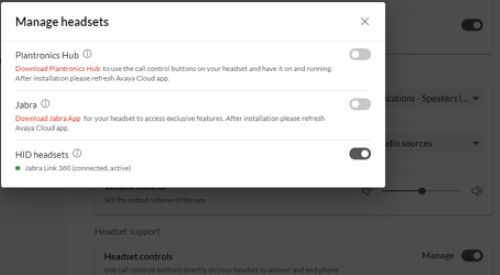
Under Headset support, click the slider next to Manage to turn it on. Select HID headsets.
Jabra Direct
Installing Jabra Direct
This software is technically not needed, but will allow you to have greater control over your headset. To install on Saunders computers, please use Portal Manager.
Updating your headset’s firmware
On your computer, open the Jabra Direct software. Ensure that your dongle is attached to the computer and that your headset is turned on.

Click Updates along the left hand side.
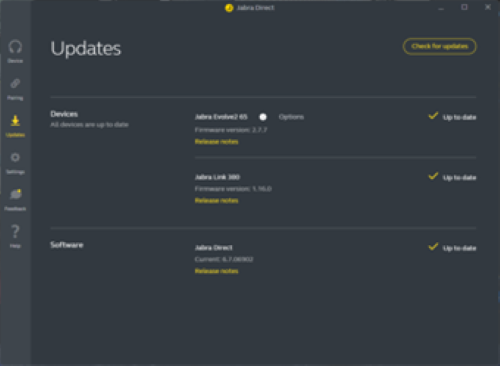
In the upper right, you can click Check for updates.
Updates notifications will be automatic. Firmware updates can be installed without admin rights. Software updates require admin rights, so you can ignore those prompts. We’ll automatically deploy updates as they become available.
Videos from Avaya
- Avaya Cloud Office Training Video Library
- User Login/Logout an Avaya Cloud Office
- Overview of the UI on Avaya Cloud Office
- General User Details
- User Details, Settings, and Permissions
- Record your User Name
- Avaya Cloud Office My Extension: Send a Fax
- Call Handling and Forwarding
- Manage Voice and Fax Messages
- Composing a Fax Cover Page
- Voicemail Settings
- Personal Contacts
- Setting Business Hours
Additional Training Videos from Avaya
64512W – Using Avaya Cloud Office Service Web
- 1 – User Login/Logout on Avaya Cloud Office
- 2 – Overview of the UI on Avaya Cloud Office
- 3 – General User Details
- 4 – User Details Settings and Permissions
- 5 – Record your User Name
- 6 – Avaya Cloud Office My Extension: Send a Fax
- 7 – Avaya Cloud Office My Extension: Use Ring Out
- 8 – Send an E-mail Invite for a Conference
- 9 – Call Handling and Forwarding
- 10 – Avaya Cloud Office My Extension: Voicemail Settings
- 11 – Add Personal Contacts to My Extensions
- 12 – Export Personal Contacts
- 13 – Import Personal Contacts
- 14 – Create Personal Contact Groups
- 15 – Search Personal Contacts
- 16 – Set Business Hours
- 17 – Set Greetings, Screening and Connecting Message
- 18 – Add Custom Call Answering Rules
- 19 – After Hours: Send Calls to Voicemail
- 20 – After Hours: Play Announcement And Disconnect
- 21 – After Hours: Forward Calls
- 22 – After Hours: Unconditional Forwarding
- 23 – Set Custom Rule Based on Caller ID
- 24 – Create a Ring Group for Call Handling
- 25 – Modify a Ring Group for Call Handling
- 26 – Incoming Call Information: Play Announcement
- 27 – Incoming Call Information: Called Number
- 28 – Incoming Call Information: Add Digits
- 29 – Change Message Notification Settings
- 30 – Manage Voice and Fax Messages
- 31 – Managing Phone Recordings
- 32 – Composing a Fax Cover Page
- 33 – Adding Delegates to Make Calls on Behalf of an Executive
- 34 – Adding Appearance Buttons to Monitor Other Users
- 35 – Select Users Permitted to Answer my Calls
- 36 – Adding Email Addresses to Send Faxes via Email
- 37 – Changing Call Handling Rules for a User as a Group Manager
- 38 – Analyzing Call Logs for a User as a Group Manager
- 39 – Reviewing Call History Reports as a Group Manager
- 40 – Managing Call Queue Messages as a Call Queue Manager
- 41 – Managing Call Queue Settings as a Call Queue Manager
- 42 – Adding Members to a Call Queue
- 43 – Changing Call Queue Wait Settings as a Call Queue Manager
- 44 – Blocking Specific Telephone Numbers
- 45 – Accessing Web Messaging and Meetings
- 46 – Configuring Call Handling for Call Flip
- 47 – Managing a Call Queue Member’s Status within the Queue
- 48 – Changing Pick-up Settings and Members for Call Queues
- 49 – Configuring Softkeys For a J-Series Phone
- 50 – Assigning Features to LED Buttons on a J-Series Phone
- 51 – Modifying Call Queue Wait Settings
64213W – Using Avaya Cloud Office Desktop App
- 1 – Introducing the Avaya Cloud Office Desktop App
- 2 – Activating your Account for Avaya Cloud Office
- 3 – Downloading and Installing the Avaya Cloud Office Desktop App
- 4 – Logging into the Avaya Cloud Office Desktop App
- 5 – Getting Started with the Avaya Cloud Office Desktop App
- 6 – Starting a Conversation in the Avaya Cloud Office Desktop App
- 7 – Launching the Service Web Portal My Extension
- 8 – Managing Your User Profile
- 9 – Sharing and Changing a User’s Online Status in the App
- 10 – Customizing your Desktop Notifications
- 11 – Customizing your E-mail Notifications
- 12 – Changing the Colors of the Desktop App
- 13 – Connecting Your Calendar and Contacts to the Desktop App
- 14 – Modifying the List of Direct Messages
- 15 – Modifying New Message Counter Settings
- 16 – Changing the Default app for Phone Calls
- 17 – Creating Teams in the Desktop App
- 18 – Using @ or Mentions in Team Conversations in the Desktop App
- 19 – Managing Teams in the Desktop App
- 20 – Closing and Archiving Teams in the Desktop App
- 21 – Deleting Teams in the Desktop App
- 22 – Using Built-In Conversation Features
- 23 – Managing Files in Conversations
- 24 – Using Markdown with Conversations
- 25 – Creating New Tasks within Conversations in the App
- 26 – Managing Tasks in Conversations in the App
- 27 – Creating New Events in Conversations in the App
- 28 – Managing Events in Conversations in the App
- 29 – Creating and Working with Notes in Conversations in the App
- 30 – Using Favorites in the Avaya Cloud Office Desktop App
- 31 – Locating and Bookmarking Messages in the App
- 32 – Inviting External Contacts to a Video Meeting by Sending a Link
- 33 – Using Comprehensive search
- 34 – Organizing Conversations into Folders
- 35 – Using Text Formatting in Conversations in the App
- 36 – Hosting Unscheduled or Instant Meetings
- 37 – Starting Meetings within Conversations
- 38 – Sharing Your Screen within Meetings in the App
- 39 – Inviting Participants to an Active Meeting in the Desktop App
- 40 – Using Chat within an Active Meeting in the App
- 41 – Scheduling a Meeting in the Desktop App
- 42 – Joining a Meeting in the Desktop App
- 43 – Recording Meetings in the Desktop App
- 44 – Joining a Scheduled Meeting in the Desktop App
- 45 – Scheduling a Meeting in the App with a Connected Outlook Calendar
- 46 – Starting a Meeting with Your Personal Meeting ID
- 47 – Managing Meeting Waiting Room Settings
- 48 – Placing a Phone Call from the App
- 49 – Reviewing Call History in the Desktop App
- 50 – Transferring a call to another User or Extension
- 51 – Pausing an active Call
- 52 – Using Call Park to allow another User to pick-up a Call
- 53 – Recording Telephone Conversations
- 54 – Adding another Party to a Call
- 55 – Sending a Fax from the Desktop App
- 56 – Switching a Call to Your Mobile Device
- 57 – Managing Queue Calls from the Desktop App
- 58 – Using Call Flip to Continue a Call on Another Device
- 59 – Managing Admins on the Desktop App
- 60 – Administering Conversations with Guests in the Desktop App1 – User Login/Logout on Avaya Cloud Office
64411W – Using Avaya Cloud Office Mobile App
- 1 – Installing the Avaya Cloud Office Mobile App (iOS)
- 2 – Installing the Avaya Cloud Office Mobile App (Android)
- 3 – Signing Into the Avaya Cloud Office Mobile App (Native)
- 4 – Signing Into Avaya Cloud Office Mobile App (Google)
- 5 – Exploring the Avaya Cloud Office Mobile App
- 6 – Managing Your Presence Status
- 7 – Changing Notification Settings
- 8 – Changing the Personal Meeting ID
- 9 – Configuring Video Meeting Settings
- 10 – Changing Your Default Caller ID
- 11 – Recording Your Personal Voicemail Greeting
- 12 – Connecting Your Google Calendar
- 13 – Selecting Your Data Settings for Outbound Calls
- 14 – Using the Message Interface
- 15 – Starting a Conversation in the Mobile App
- 16 – Creating a Group for Direct Messaging
- 17 – Creating a Team for Messaging
- 18 – Managing Your Voicemails in the Mobile App
- 19 – Making Calls on the Mobile App
- 20 – Exploring Call Actions During an Active Call
- 21 – Sending a Fax in the Mobile App
- 22 – Introducing Meeting Features in the Mobile App
- 23 – Starting a Video Meeting in the Mobile App
- 24 – Exploring Meeting Controls During an Active Video Meeting
- 25 – Scheduling a Video Meeting in your Outlook Calendar
- 26 – Joining a Video Meeting in the Mobile App
- 27 – Starting a Video Call and Switching to the Desktop App
- 28 – Sending Files in the Messaging Interface
- 29 – Using Mentions in Team Conversations in the Mobile App
- 30 – Managing Team Members in the Mobile App
64311W – Using Avaya Cloud Phone App for Desktop
- 1 – Downloading and Installing the Avaya Cloud Phone App
- 2 – Logging Into the Avaya Cloud Phone App
- 3 – Getting Started With the Avaya Cloud Phone App
- 4 – Managing the User Profile in the Cloud Phone App
- 5 – Placing a Phone Call From the App
- 6 – Pausing an active Phone Call
- 7 – Managing an Incoming Call
- 8 – Transferring a Call to Another User or Extension
- 9 – Using Call Park to Allow Another User to Pick-up a Call
- 10 – Recording Telephone Conversations
- 11 – Adding Another Party for a Conference Call
- 12 – Using Call Flip to Continue a Call on Another Device
- 13 – Managing Received Messages
- 14 – Adding Contacts to the Favorites List
- 15 – Administering the Call Log
- 16 – Managing Contacts in Your Contact Directory
- 17 – Using the Head-Up Display
- 18 – Activating HUD Settings
- 19 – Picking up Calls for Other Users with the HUD
- 20 – Placing Calls on Behalf of Other Users with the HUD
- 21 – Using Private Call Park Locations with the HUD
- 22 – Using Text Messages to Communicate
- 23 – Starting a Phone Conference
- 24 – Composing a Fax Message
- 25 – Launching the Avaya Cloud Desktop App for Video Meetings
64610W – Using J-Series Phones with Avaya Cloud Office
- 1 – Getting Started With a J-Series Phone
- 2 – Making an Outgoing Call With a J-Series Phone
- 3 – Answering an Incoming Call With a J-Series Phone
- 4 – Using Hold to Manage Incoming Calls
- 5 – Applying Transfer Options to Manage Call Traffic
- 6 – Adding Another Party for a Conference Call
- 7 – Reviewing Your Call History Options
- 8 – Accessing Your Voicemail Messages
- 9 – Using Your Contacts Directory to Make Calls
- 10 – Adding a New Contact to Your Personal Directory
- 11 – Modifying a Contact in Your Personal Directory
- 12 – Activating Call Forwarding Options
- 13 – Setting Do Not Disturb on a J-Series Phone
- 14 – Activating Call Park on a J-Series Phone
- 15 – Using Call Park and Page on a J-Series Phone
- 16 – Parking a Call on a Private Park Location
- 17 – Using Page and Answer on a J-Series Phone
- 18 – Answering Calls for Monitored Extensions or Bridged Call Appearance
- 19 – Using Visual Voicemail on a J-Series Phone
- 20 – Setting Backgrounds and Screen Savers