Nav
Classrooms & Conference Rooms

LOW-1050

LOW-1215

LOW-3000 and LOW 3025

LOW-1135, LOW-3015 and LOW-3040

LOW-3135

LOW-3057

LOW-4050

Computer Labs

Computers and Laptops

Computer Audio – Selecting Speakers

Driver Updates

Laptop Stands

Lenovo X1 Yoga – Battery Reset

Lenovo X1 Yoga – Camera Shutter

Lenovo X1 Yoga – Docking Station

Lenovo X1 Yoga – Increase Battery Life

Lenovo X1 Yoga – Monitors Not Working

New Computer Setup

Power Settings on Laptop

RDP vs. VPN

Remote Desktop

RIT Wireless Network

Running Hardware Diagnostics

Windows Updates from Microsoft

Email and Calendar

Adding a shared Exchange mailbox

Automatic Replies (Vacation Message)

Creating A Meeting Invite

Email Signatures

Filter all Meeting Requests and Updates to another folder

Forwarding Email Headers

Junk Email & Spam

Mailing Lists

Saunders Activities Calendar

Sending email from another account

Setting up the Outlook app on Mobile Devices

Sharing and Opening a Shared Calendar

Equipment Reservations

Executive MBA Support

EMBA Slack

File Services

Google Drive File Stream

OneDrive

Help Articles

Capstone Servers

Events Management System

Getting Software

How to screen share an iOS device in a Desktop Zoom meeting

Improve the speed of your iPhone/iPad

LanSchool Teacher Console Issues

PDF Printing Is Very Slow

Reset Outlook Search Index

Saunders Q&A Wednesdays

Schedule a Zoom Meeting on Behalf of Another

Inside.SCB & Sedona

Policies and Forms

PaF – Access to Offices

PaF – Data Store Policy

Printing and Scanning

Saunders Student Printing

Service Requests

Software and Databases
Adobe Software

How to Fix Adobe Serial Number Problem

Setting Up Certificate-Based Signatures in Adobe Acrobat

AI Tools

ATLAS.ti

Avaya Cloud Office Phone System

Handset Instructions

Azure Dev Tools for Teaching

Bizagi Modeler

Bloomberg

CrashPlan

Dedoose

EMS Desktop Client

FASB

Google Apps at RIT

Google Jamboard

Home Use

HubSpot

Ivanti

Force a Security Scan

Force an Inventory Scan

Portal Manager

KeePass

Leximancer

Microsoft Office

Microsoft OneNote

Microsoft Whiteboard

Overleaf

Password Managers

Qualtrics Surveys

RIT VPN Client

SAP

Slack

Spirion

SPSS

Stata

Tableau

Web Browsers

Browser Extensions

Browser Sign-In

Changing the Default Search Engine

Clearing the Browser Cache and Cookies

Disable YouTube Auto Play

Edge URL Copy and Paste

Recommended Browsers

Windows 10

Weathers & News Taskbar

Windows 10 – Default Applications

Windows 11

Windows 11 – Cannot Delete Public Desktop Icons

Windows 11 – Default Applications

Windows 11 – Start Menu & Taskbar

Windows 11 – Time Zone is Wrong

WRDS

Zoom

Zoom – Automatic Transcriptions

Zoom – Closed Captioning

Zoom – Remote Support

Zoom – Using Google Drive to Store Recordings

Zoom – Share Recordings

How-to articles

Zoom – Share Recordings

Overview

When sharing your recordings, you want to ensure that only those that should see the recording can do so. There’s several different options available to RIT.

This document was last updated on February 9, 2024. Zoom does make changes to its software on a regular basis that may result in these instructions being outdated.

Default Settings

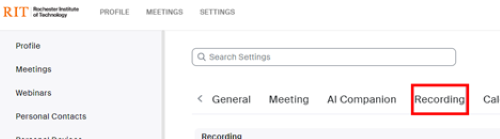
To review your default settings for how your recordings are shared, start by going to https://rit.zoom.us/profile/setting. When signing in, be sure to click on SSO and then enter RIT as the organization. This will redirect you to an RIT logon page.

Click on Recording along the top.

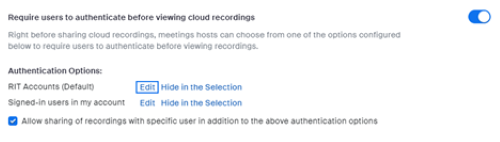
Scroll down until you reach the Require users to authenticate before viewing cloud recordings section.

It is strongly recommended you turn this setting on and make sure that RIT Accounts (Default) is listed. This will ensure that all of your recordings by default require and RIT account to view.

You can change the settings on individual records (recommended method) by following the instructions later in this document.


Change the share permissions on an individual recording

To view your recordings, start by going to https://rit.zoom.us/recording. When signing in, be sure to click on SSO and then enter RIT as the organization. This will redirect you to an RIT logon page.

Find the recording you want to change the permissions for and click Share.

The default will be based on your default settings (see instructions above). You can change this for an individual recording using two sections, Who can view and Share with specific people.
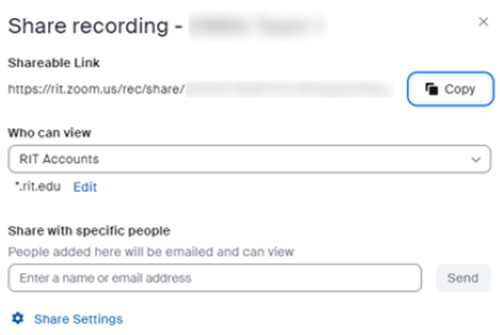
Who can view can be set to the following settings:

  • Everyone with the recording link
    • Anyone you send the link to can access the recording with no authentication required.
  • RIT Accounts
    • The viewer must have a valid RIT Zoom account (faculty, staff, and students) to view the recording.
  • Signed-in users in my account
    • The viewer must have a valid RIT Zoom account (faculty, staff, and students) or be affiliated with RIT (typically captioning services) to view the recording.
  • Only people you shared with below
    • You have to use the Share with specific people option to provide the Zoom account email addresses of who can access the recording. For RIT, this will be the username followed by @rit.edu. Do not use RIT aliases for this. You’ll need the email address of the Zoom account for anyone that is not affiliated with RIT.
  • Nobody else can view
    • Recording is only accessible by the owner, you.

Share with specific people settings:

Provide the Zoom account email addresses of who can access the recording. For RIT, this will be the username followed by @rit.edu. Do not use RIT aliases for this. You’ll need the email address of the Zoom account for anyone that is not affiliated with RIT.